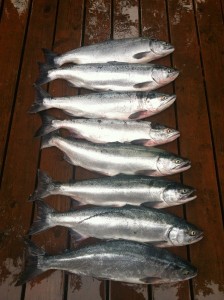
- Sockeye Salmon Caught in the Chilkat Inlet Near Haines, Alaska August 4, 2012
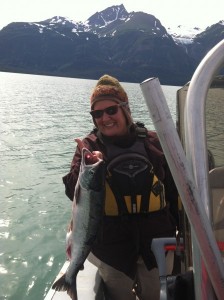
- The first fish we pulled out of our net
Being an Alaskan resident has many perks. One of them is being able to gill net subsistence fish for Sockeye Salmon. We landed 8 sockeye yesterday in our net. I prefer to can my salmon than to freeze it as it can be stored on a shelf rather than taking up limited freezer space. We canned three fish and smoked and canned the other five. Here are the directions for both:
Canning
Initiation
You need whole sockeye salmon, canning jars (1 pt jar per pound of salmon), white vinegar, pressure cooker, non-iodized salt, 1 lemon, sharp filet knife.
Catching the sockeye requires you first know where to go, when, and how to do it. Then you have to legally get them in a drift net. It always helps to fish where the fish are and not be arrested while doing this. For us this time, they were near the shore on the southern part of the Chilkat Inlet two hours before high tide a couple days after the first full moon in August. And yes, Fish and Game came by to verify we had the right subsistence permit. We did miss the big sockeye run in the Lutak Inlet by a week. In years past I’ve had friends who hit their daily possession limit of 25 fish in less than an hour by being in the Lutak Inlet during one of the season’s sockeye runs. Next year I’m going to check with Fish and Game to find out the fish counts on the Chilkoot River Weir and the Chilkat River Fish Wheel.
Planning
Preparing the fish (same for both canning and smoking then canning)
1. Remove the head, guts, fins.
2. Soak in cold water with a couple tablespoons of white vinegar to remove the slime.
3. Can within 24 hours of catching the fish and keep the fish on ice until you can them.
4. Dry off the fish and remove the slime (many of the scales will come off too) – use a dry clean towel.
5. Prepare the jars – wash in the dishwasher – both jars and lids.
Execution
Filling the Jars with Salmon
1. Cut the fish into steaks – about one and a half inch thick. You cut through all the bones. Canning is cooking the fish at high pressure and there are many nutrients in the bones and the skin that are edible and preserved with this method of preparation.
2. Place one steak and a couple extra pieces per jar (pack the jar full).
3. Fill the jar with cold water to about 1/2 inch below the top of the lid.
4. Put in a small piece of lemon if desired and 1/2 tsp of non-iodized salt.
5. Clean off the rim of the jar with a paper towel of clean dish towel.
6. Put the lids on and seal tight.
Cooking in the Pressure Cooker
1. Put a tray in the bottom to keep the jars off the bottom
2. Put about three inches of water in the pressure cooker
3. Put one or two layers of jars in the pressure cooker.
4. Seal the lid – make sure the lid top arrow lines up to the line on the pan. Tighten the bolts one at a time on opposite sides to get an even seal.
5. Put the pressure weight on the steam hole on the ten pound slot.
6. Put the stove on medium high to high.
Monitor and Control
7. Once the pressure weight starts to shake – look at the pressure gauge. It should be reading ten pounds (this is for at sea level).
Watch the gauge – if it goes too high, reduce the heat.
8. Time 100 minutes from this point. After 100 minutes, you are done canning the salmon.
9. Let the pressure cooker cool before removing the lid
10. Remove the jars and let cool.
11. Tap on the lids – if it is a high pitched tinging sound – the seal is good. If it is a low pitched, thud, the seal is not good – refrigerate this jar and eat soon or freeze.
Closeout
I use the canned salmon to make salmon salad – kind of like tuna salad with celery, mayonnaise, pickles. I also use it to make salmon burgers.
Smoking then Canning
Initiation
Need all the same ingredients and tools as for canning. Need a smoker, a fan, racks, smoking chips, 1 cup brown sugar, 1/2 cup salt (non-iodized) per ten pounds of fish, lots of space in your refrigerator for the salmon. Put the smoking chips in a bowl and soak them in water.
Plan
Preparing the salmon
1. Mix the brown sugar and salt (ratio – 2 times as much brown sugar as salt). We had five fish, about 8 pounds each and used 4 cups of brown sugar and 2 cups non-iodized salt.
2. Cut the fish into 1/2 inch steaks.
3. Rub both sides with the brown sugar and salt mixture.
4. Put on a tray and put in the fridge for at least an hour but no more than 24 hours.
5. Rinse each salmon steak in cold water.
6. Put each salmon steak back on the tray (better than a cookie sheet as it’s easier to dry out).
7. Put the trays in front of a fan (we have an oven that blows a fan with no heat).
8. Once the salmon steaks look shiny on top – they are done drying (takes about an hour or two).
Smoking the salmon
1. Put the glazed salmon steaks on greased racks from the smoker.
2. Put the wet smoking chips in the bottom smoking tray.
3. Smoke for four hours (eight if you are not canning).
Canning the smoked salmon
1. Pack the smoked salmon in the cleaned canning jar.
2. DO NOT fill with water. Put the lids on and seal tight.
FOLLOW THE SAME INSTRUCTIONS AS ABOVE FOR USING THE PRESSURE COOKER.
Closeout
We use the smoked canned salmon for spreading on crackers and for just eating plan as appetizers. This is a huge hit at parties.
