Archive for November, 2010

Thanksgiving 2010 – the best of…….

Friday, November 26th, 2010

I’ve done a Thanksgiving day mulligan in the past when some part of the event either went over so well that I just have to repeat it or if something bombed and I want a second chance to redeem myself.  This year a couple friends and I are doing the best of Thanksgiving 2010.   Here is my recipe:

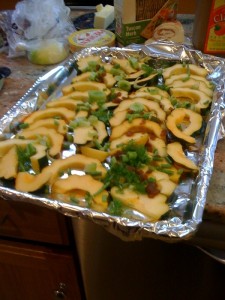
Acorn Squash and Fennel BEFORE putting on the Brown Sugar Liquid.

Acorn Squash and Fennel BEFORE putting on the Brown Sugar Liquid.

Candied Acorn Squash and Fennel

Initiation – My garden this year produced a bumper crop of acorn squash and the fennel is still going strong.   I saw this recipe that had the acorn squash cut in half moon slices about 1/2 inch think and roasted – it looked interesting.   But I wanted to use the fennel too.

Planning – 2 acorn squash, 2 small stalks celery, 1 cup brown sugar, 1/2 cup salted butter, 1/2 cup water

Execution –

Cut the acorn squash in half and remove the seeds (I roast the seeds in a small pie dish with a little salt).   Cut the halves in half again.  Slice in 1/2 inch crescents.

Slice the fennel – up to where it gets really leafy.

Melt the brown sugar in the butter, whisk in the water.

Arrange the acorn squash flat on pan with sides (a cookie sheet with low sides will work).   Sprinkle the fennel over the top.   Cover with the brown sugar liquid mixture.  Flip over acorn squash slices to cover both sides in the brown sugar liquid.

Cover and place in a 350 degree oven for an hour.

Uncover and cook for another 30 minutes or until most of the sauce has soaked into the acorn squash.

Monitoring and Control – watch the squash the last half hour and keep it in longer if the sauce is not all soaked into the acorn squash.

Closeout – This is BETTER than candied yams and no animals were hurt in the creation of this masterpiece.
Phenomenal Onion Fennel Soup

Saturday, November 20th, 2010

Michelle LaBrosse, PMP

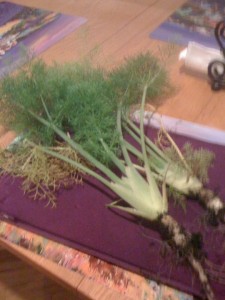
Pulled this out of my New England garden in late November.  Rather amazing it survived several weeks of hard frosts.

Pulled this out of my New England garden in late November. Rather amazing it survived several weeks of hard frosts.

Initiation – I picked up Barefoot Contessa’s “How Easy is That?” cookbook and wanted to try her Onion Fennel Gratin soup.   I modified it a bit based on my personal preferences- it came out GREAT!!!!!

Planning –  I got most of these ingredients at a small neighborhood grocery store – nothing too fancy in this soup.

4 16 oz cartons of organic beef broth.

2 small shallots, finely chopped

1/4 pound organic cultured butter (YES it makes a difference)

1 pound beef soup bones.

1 large spanish onion

1 large red onion.

2 small stalks fennel (I had these in the garden still)

1/2 cup white wine

1 tsp pink Himalayan salt (sea salt would be fine)

1/2 tsp freshly ground pepper

1 cup grated gruyere cheese

1/2 inch thick sliced bread (anything will do – i prefer whole grain bread)

Execution –

Making the Stock –

For all my soups, I start the stock a day ahead of time and let it sit for about 24 hours in the fridge.  This helps the flavor develop AND the fat solidifies on the top making it easy to remove.    For my version, start with sauteing shallots in a couple tablespoons of butter, brown a pound of beef soup bones in the butter, and add 8 cups of organic beef broth.  Simmer about two hours.  Put it in the refrigerator over night.

Making the soup –

Melt about 1/2 stick of the cultured organic butter in a 4 to 5 quart dutch oven.   Slice the onions in half rounds in about 1/4 inch strips.  And slice the entire fennel stalk.  Add all to the dutch oven.  Cook about 45 minutes over low heat and covered until the onions and fennel are tender.   Put in the wine and let it boil to cook off the alcohol.  Add the salt and pepper.   Remove the fat and the bones from the broth and add to the onions and fennel.   Simmer for 30 minutes.

Serving the soup

Ladle the soup into soup bowls.  Toast a slice of the bread and then float it on top of the soup.   Sprinkle about 1/4 cup of the gruyere cheese on top of the bread.   Put the soup bowl under the broiler for about 5 minutes to brown up the cheese.  Serve immediately.

Monitor and Control – Cook this on low temperature – it’s not a race to make this.   Use a good quality dutch oven.   I like the Le Cruset dutch ovens.

Close out – I understand that this soup freezes well.   I like doing this in the glass storage bowls so it can just go from freezer to the microwave for a single serving.

Turducken 2010

Sunday, November 14th, 2010

My friend Bob Kane, who runs Kane’s Market in Simsbury, CT asked me to assemble instructions on how I prepare his famous Turducken’s and the incredible gravy that goes along with it.   (Bob will create a custom turducken for anyone – you get to specify the size and the type of stuffing you’d prefer – and he ships them anywhere).

Here are two posts I’ve done in year’s past on my turducken cooking experiences:

http://www.michellelabrosseblogs.com/2009/11/knocked-it-out-of-the-park-with-the-turkey-gravy-no-humble-pie-here/

http://www.michellelabrosseblogs.com/2008/12/a-thanksgiving-mulligan-turduckin-take-2/

Here is a printable version of the Turducken cooking instructions:

turducken-directions1

And if you just want the directions without having to download anything – here they are as well:

Turducken www.kanesmarket.com – 860-930-3723. Directions by Michelle LaBrosse – www.everydaypm.com

Prepping Turducken

1. Preheat oven to 300 degrees.

2. Get a large oven roasting cooking bag. Line the bag with flour, pepper, salt, rosemary. You will use this for the gravy.

3. Rub butter over the turducken and salt. Use a good salt – such as a himalayen pink salt.

4. Place in the large oven roasting bag and secure the back. Poke a couple holes on the TOP of the bag (you want to be able to keep the juices in the bag for the gravy).

5. Place in a large roasting pan, put a meat thermometer into the center of the turducken and place in the oven.

Prepping Gravy

1. Making the base – While the turduckin is roasting, simmer turkey giblets (neck and accessories but not the liver) with all the leaves from one celery stalk, a tbs of whole peppercorns, and 1 tsp of salt in a 2 quart sauce pan filled with water. Cover and have on very long temperature. It will be on the stove a long time – check periodically to insure you don’t run it dry.

Cooking Turducken

6. Cook until the internal temperature reads 165 degrees (depends on the size how long this will take – estimate 5 hours).

7. Take out of oven and let sit for at least 30 minutes – covered.

Making the Gravy

8. Take the drippings out of the bag and use to make gravy. Use the bag to hold the drippings to transfer into the gravy liquid. Mix the drippings in with the base that has been simmering on the oven while the turducken was cooking.

9. Making the roux – this is the gravy thickening agent . use ¼ cup butter and ¼ cup flour (white pastry flour is best – but I’ve done it with fresh milled flour as well and it came out just fine) with ¼ tsp pepper and ½ tsp salt for the rouge. It will be very thick and clumpy. Use a two to three quart sauce pan (avoid using a Teflon and aluminum pans). Keep the temperature on low to medium low.

10. Starting with ½ cup of the base and pan drippings liquid, gradually mix the pan drippings into the roux – stirring with a wire wisk.

11. Add the drippings into the gravy in ½ cup increments, whisking to break up any lumps and to form a nice smooth gravy.

12. If the gravy is too thin, keep whisking, and let some of the liquid evaporate – keep the temp at low or medium low.

Provisioning The Road Trip

Tuesday, November 9th, 2010
We made it to San Francisco!!!!

We made it to San Francisco!!!!

Michelle LaBrosse, PMP

Initiation – For one reason or another, I find myself doing several thousand mile road trips a couple times a year.   Jumping into a car, van, truck and camper combo and driving for four days is just not something that new to me.   In September, I adopted two four week old kitties who had been abandoned.   So when I had to get to San Francisco to do the keynote presentation for International Project Management day November 4, 2010, it just made sense to pack the kitties and the puppy into the cheetah mini-van and head to San Fran from Connecticut.   It took about a week to customize the mini-van for the road trip.   Besides making it safe and comfortable for the baby animals, I also decided that unlike other road trips, I was going to survive on food that if I didn’t grow, at least I prepared from ingredients I knew the origins.

Planning – Provisioning this type of trip takes a bit more planning.  I didn’t want to spend a lot of time cooking on the road so I had to have food that would keep for at least four days.   And when I am driving, I want to drive.   I’m not much into stopping to eat a meal.   So whatever I prepared had to be easy and not messy to eat while driving.   Plus I wanted to eat food that would keep me awake and alert, without having to rely on drinking copious quantities of caffeine.   Also, it would have to be food that I was somewhat into as I did not want to be tempted to eat fast food.   I can only be so disciplined.

Execution –   To fit the above criteria, I made my homemade bread that is made from wheat I mill myself.   I learned at cooking school in France that this bread does really well if you slice it very thin using a meat slicer.   A small amount of peanut butter on one of these thin slices of bread with a little non-fat milk makes a great snack that kept me satiated for several hours.   This became one of my staples.   I also made a berry smoothie with non-fat greek yogurt and non-fat milk.   Without a lot of sugar, this shake gave me a power boost without the concurrent sugar spike then energy sag.   For snacking, I made beef jerky from rump roasts from my cattle.   It takes forever to chew and the protein kept my  energy level high.   I also learned how to make this vegetable soup called Pistou Soup at cooking school in France.   The soup is all vegetables with beans and left-over home made pasta (in CT most came out of my garden).  The soup can easily be heated up in microwaves at the quick mart gas stations or in hotel room microwaves.   This soup balances out all the beef jerky snacking while driving.  I did have to eat the soup while stopped – usually at night in the hotel after 15 hours of driving.  (I opted NOT to sleep in the van too).  The quick marts also let you have free hot water and I could make my own tea back at the mini-van.

Monitoring and Control – I used a cooler that could be plugged into the outlet of the mini-van.   This meant that I did not have to get ice. However, the cooler would not run unless the mini-van was running.  I could get away with this as it was late October during the road trip and it got below 40 at night on the route I was taking.   I had a kitchen set up in the back of the mini-van where the hatch acted as a rain tarp. In back of the mini-van kitchen, it was set up for easy access to the most used items – such as paper towels, peanut butter, tea.  I also brought 5 gallons of water – which I used a number of times for a variety of reasons throughout the trip.   It helped that I set up easy access to the water as well.

Closeout – I have more easy to eat foods for the road trip back.   In Portland I discovered this little pie maker and now have small little chicken pies to eat.   On the trip out, I had the soup in this vacuum packed sealer bag that I could microwave.  But it was kind of messy eating it this way.  So for the return trip, I am using glass bowls with the clip on lids – it will be easier to microwave and eat the soup all in one in those bowls.   The baby animal management system went fine – I have to make sure that I keep the access to the front seat area blocked as the kitties are very exploratory and have found their way recently to my feet – not cool.

Mastermind Your Future

Saturday, November 6th, 2010

Michelle LaBrosse, PMP

Mastermind Your Future - Create a Better Life - it's Possible

Mastermind Your Future - Create a Better Life - it

I had no idea what I was in for when my friend Nishanto Kane asked me to lead a mastermind group for her and a group of her small business friends in Simsbury, Connecticut.   Nishanto assembled a group of 12 people for her Mastermind Group.  She got the idea after reading Napoleon Hill’s book – Think and Grow Rich.   We had our first meeting in August and agreed to meet every two to three weeks throughout the year.  I quickly adopted a format based on what I had found worked with groups over my years of running accelerated learning events and leading project teams.   This proved to be one of our critical success factors.  After just four months of running this group, every participating member has significantly increased and super charged their business.   It is like all of us are on this wild cheetah going for the fastest ride of our lives.

After the second meeting,  one of the participants asked me if I could teach her how to facilitate my flavor of Mastermind.    Not wanting to let down one of my mastermind group members, I said – of course.   Let me go create an online certified Cheetah Mastermind Facilitator’s program.   And off we went – at cheetah speed.

This experience has been nothing short of amazing.  The people who have gone through the program and who have emerged as certified Cheetah Mastermind Facilitators are taking the world by storm with their own Cheetah Mastermind groups.  We are even working with some groups to create a virtual model for running Cheetah Mastermind Groups.  To learn more – check out www.cheetahmastermind.com

To become a Certified Cheetah Mastermind Facilitator, you have to successfully complete a 33 hour online course where you learn how to successfully lead your own Cheetah Mastermind group.   The course list price is $999, but as a “bleader” of the Everyday PM blog, you can get it for $333 – use the promotion code blogmaster at the Cheetah Mastermind Course.

San Francisco Giants Fans Celebrate International Project Management Day

Friday, November 5th, 2010

Michelle LaBrosse, PMP

I had no idea when I was invited to be the opening keynote speaker at the San Francisco PMI Chapter’s International Project Management day conference, that it would be following on the heels of the San Francisco Giants winning the world series.   When this happened, we decided to dedicate the keynote presentation to the San Francisco Giants and had our fabulous Sweet Adeline singing sensation Jean Steinmetz, PMP create a song celebrating Project Managers.  It is sung to the tune of Take Me Out to the Ballpark.   The sing along was a lot of fun.   Here is the video.   http://www.youtube.com/watch?v=ux4tDLNwiaI